


AzureAD SSO with IBM Domino
- Details
- Category: Azure AD and Identity
Microsoft and IBM technology won't mix. Right?
I recently had a client who wanted to use Azure Active Directory for Single Sign On with an IBM Domino web application (which was hosted elsewhere) - and after some initial confusion it works like a charm!
Let me quickly walk you through the concept - and then get down to the nitty gritty details of configuring it for those of you who are in the same bind.
IBM Domino and Active Directory... Normally, we'd use ADFS to link those two. But in this case there WAS no on premises Active Directory to talk to. All identities were migrated to Office 365 (and therefore AzureAD). What to do? Basically the same as before: Use SAML. Simply replace ADFS by AzureAD.
Or at least, that's the idea. While this DOES work, the word "simply" was key here: it took quite some figuring out. To save you this trouble, here are our (high level) findings:
- The "Sign On URL (optional)" field in AzureAD should be left empty
- The "Reply URL" (also called "Assertion Consumer Service", or ACS) has to be https://<domainname>/names.nsf?SAMLLogin (not the application’s path - but "names.nsf" followed by "?SAMLLogin")
- When importing the FederationMetadata.xml into IBM Domino, the "encryption certificate" stays empty. This is not an error.
- The script importing the XML file replaces the last part of the "Single Sign On URL" with "IdpInitiatedSignOn.aspx". This needs to be undone manually to read "/saml2" again
Okay, ready for giving this a roll? Then read on!
Azure settings
Publishing the application
Application publishing in Azure AD can now be done from the new portal. However, in our test, the resulting application did not always work as expected. In this article I therefore use the Classic portal.
Choose the “Applications” menu option and then click on the “Add” button to add a new application.![]()
To start, go to the Active Directory blade and chose the directory in which the application needs to be published in.
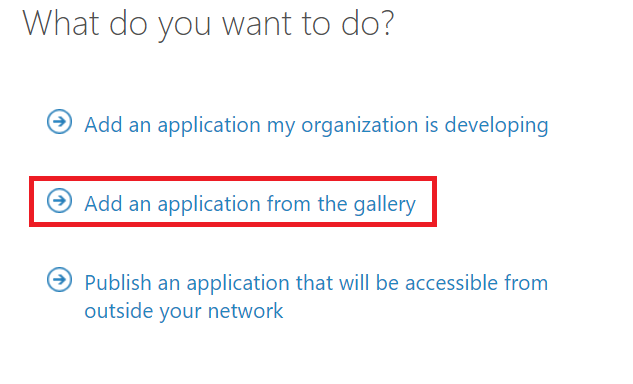
Select the second option, “Add an application from the gallery”. I know – this feels counter intuitive…
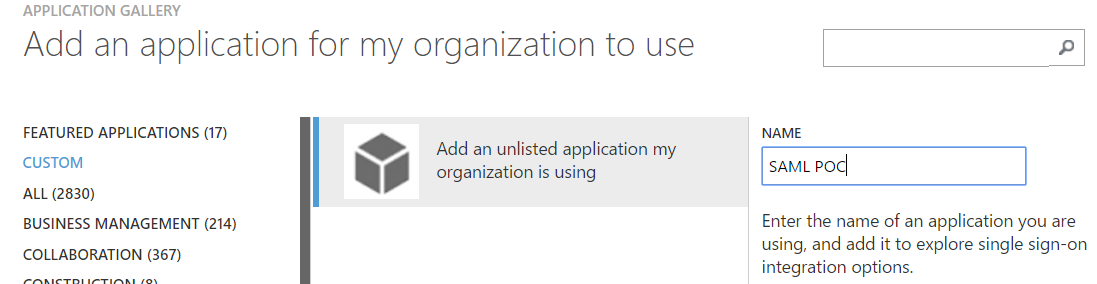
Select “Custom” and enter a name for your application. Once you click to accept this the application will be created.
Preparing the application for Single Sign On in Azure AD
If you are not sent directly to the application’s dashboard then click on the application’s name to open its properties.
Click on the “Configure single sign-on” 
Select the first option: “Microsoft Azure AD Single Sign-On”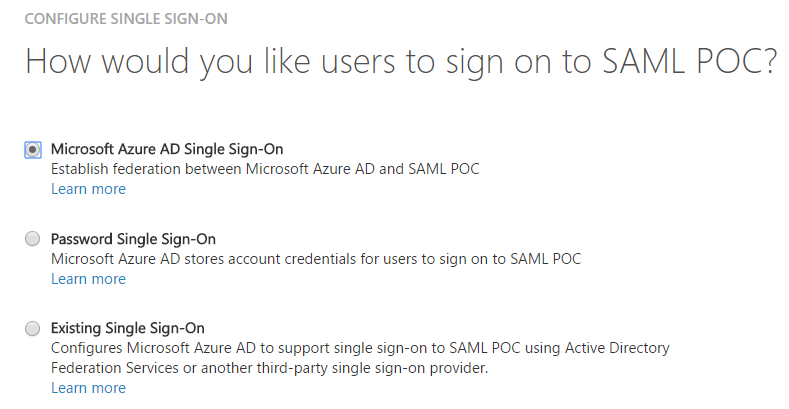
Enter the application’s details. A few things here are important: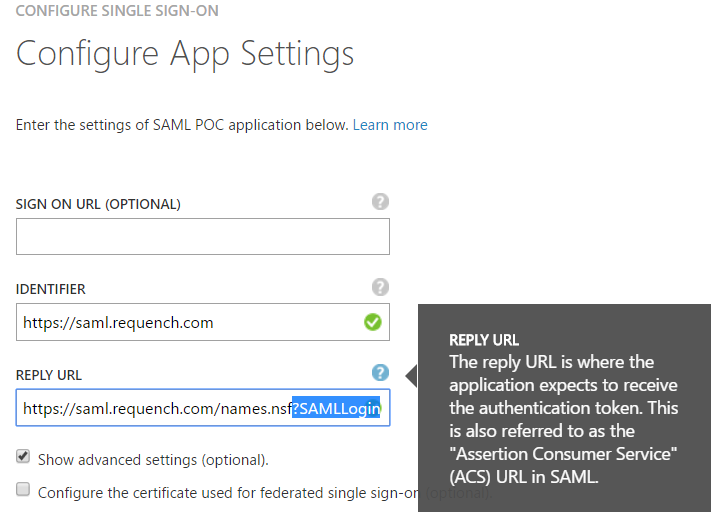
- Select the “Show advanced settings (optional)”. This ensures that the “Sign On URL (Optional)” is shown. Make sure that this field stays empty
- The “Identifier” field is the URL which we’ll configure as Service Provider URL in Domino later. It needs to match your application’s URL.
- The “Reply URL” is what threw us off course for the longest time. It needs to point to the webserver’s names.nsf – appended with ?SAMLLogin. Not your application, not the server root, but names.nsf. If this is entered incorrectly then Domino will receive the SAML token from Azure AD – only to redirect back to the sign in URL and ask for it again.
- In this scenario I chose to use the X.509 certificate provided by Azure AD. I haven’t tested adding a custom certificate here.
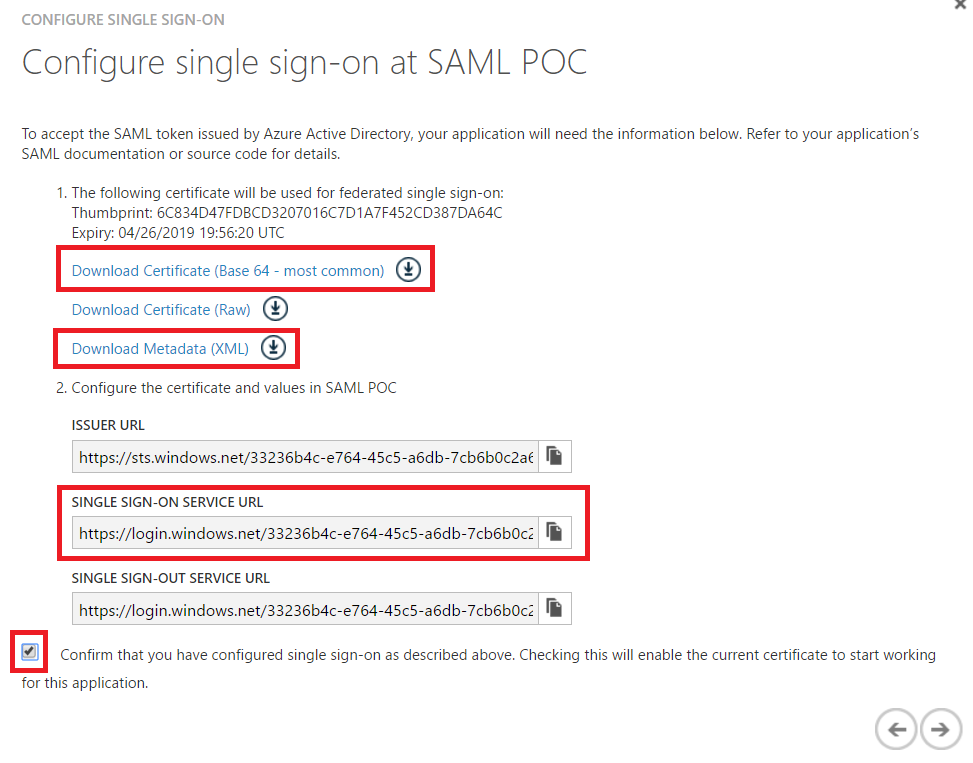 The next screen will take a bit to appear and contains the information we'll need to configure Domino.
- Download the Base 64 certificate for your reference (it will be imported into our SAML settings later from the federationmetadata.xml file automatically as well)
- Download the FederationMetadata XML file (you will need it when configuring Domino)
- Copy the Single Sign-On Service URL to a text file (you will need it when configuring Domino)
- Make sure you check the “Confirm…” box so you can proceed
Enter the address on which you’ll receive the notification – and you're done.
Assigning users
To be able to actually use the application you’ll need to allow users to use it. Assign a test account or test group for now by going to the application’s dashboard and clicking on option 3: “Assign users to <your application>”
A windows with the option to select groups or users will pop up. Select the user or group, then click “Assign” and confirm that you want to enable access (in a testing scenario you’ll most likely want to assign the application to a few test users first)
NB: The users performing single sign on must exist in both Azure AD/Office 365 and Domino Directory. Furthermore, the user’s mail address in Azure AD and the internet mail address in Domino must match. Although SAML provides for SSO, the procedure described here does not perform automatic provisioning for users which do not yet exist in Domino.
Optional: Adding the NameID attribute
In the test-setup I added the NameID attribute to comply with the reference to this settings when implementing ADFS made in various IBM whitepapers. In practice the logon still worked when I removed the attribute from the scenario… In hsort, your mileage may vary if you leave this out. I would just add it to err on the side of caution.
- Select “Attributes” in the application’s menu, then click on “add user attribute”
- Enter “NameID” as the Attribute Name
- Select user.mail from the drop down menu
- Make sure you don’t miss clicking on “Apply changes” to save the edits
IBM Domino
Create and configure idpcat.nsf
Create a new application in the IBM Domino Administrator (File | Application | New – or Ctrl+N)
Chose the server, enter the database name: idpcat.nsf
Find the “IdP Catalog” template on the server (make sure you select “Show advanced templates”)
Click on “Add IdP Config” to open the configuration dialog
Enter the website (and ip address if you’re using SSL, which is something you definitely want to do…)
Enter a name for your IdP. Anything will do ,as long as it helps you to identify whom you’re talking to.
Choose SAML 2.0 as Protocol version
Keep ADFS as the Federation product
You Service provider ID needs to match the value entered in Azure
Keep the Artifact resolution service URL field empty
Now copy the FederationMetadata.xml file to a location on the server, click “Import XML file” and import the FederationMetadataXML from where you copied it to.
A few things need to be mentioned here:
- The file will be deleted from the server’s file system during the import process. So make sure you have a copy elsewhere
- The import script will fill the Signing X.509 certificate with the certificate provided by Azure. You can double check this against the Base 64 certificate you downloaded earlier)
- The Single sign-on service URL provided by the metadata document is actually altered by the import script: IdpInitiatedSignOn.aspx is added to the URL. To err on the save side of caution replace the entire URL with the string you copied form the summary screen in Azure (it should end in /saml2)
- The Encryption certificate stays empty. This is no problem and to be expected.
Next, open the Certificate Management tab and enter a value in the Company name.
In order to actually create the certificate the configuration will first need to be saved. So, click “Save and Close”.
Once done, re-open the configuration and go back to Certificate Management.
Get back into edit mode and click “Create Certificate”.
Go back to the Certificate Management tab again and enter the Domino server URL (likely the same as your Service Provider ID) and the Single logout URL (this is the same as the Single sign-on service URL)
Once everything has been set, click “Export XML” and then “Save & Close” the document. The IDP.xml file will be added to the idpcat.nsf now.
Finally, set the web site (or web server) configuration’s Session verification setting to SAML.
Make sure you restart the http task – time to go testing!
Finally: testing!
Log into https://myapps.microsoft.com with a user to whom the application was assigned (tip: use Internet Explorer in “InPrivate” or Chrome in “Anonymous” mode to avoid inadvertently signing in with other credentials).
You should be greeted by a list of applications – including the shiny new custom one.
Click on the application and enjoy the fruits of your hard work.
NB: directly accessing the application via its URL will not work. To access the application directly (i.e. without first going to myapps) you can provide users with a bookmark to the application’s direct link. This link